Drywall, Plaster And Stucco Providers In Toronto (GTA)

Repairing torn drywall facing is seldom problematic. Merely adhere the patch to the wall and canopy with drywall compound. It isn’t essential to strengthen the horizontal edges of the replacement drywall. Reduce along the lines on the wall with a drywall knife. Earlier than the drywall compound dries, add texture to it with a brief-handled stomping brush. Let dry, then add a 3rd coat to smooth any remaining uneven areas. A scrap of drywall, a leftover piece of window screening, some joint compound, and a few widespread tools are all it takes, should you use the outlet-patching approach demonstrated on the next Step-By-Step by This Outdated Home general contractor Tom Silva.

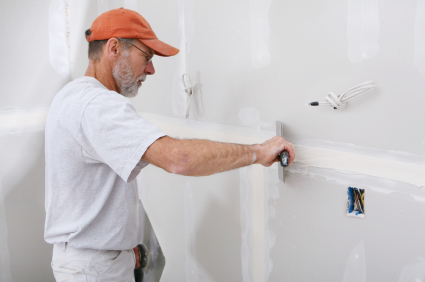
Rating the back of the drywall with a field cutter or knife about an inch from all sides. Place the patch over the hole and pencil its outline on the broken wall. To make use of the patch, just clean the wall surface and sand it to give the floor a little ‘tooth.’ Then stick the patch over the outlet and cover it with two or three skinny layers of joint compound. Photo 5: Sand the dry compound calmly with 100-grit sandpaper to remove ridges and blend edges.

Apply …

How To Restore Drywall In 9 Simple Steps

If your private home ever will get flooded, likelihood is that the water damage will call for some drywall repairs. Lower a bit of drywall into a square slightly bit larger than the hole. Cowl the patch and tape with joint compound, feathering the sides. Drywall injury can vary from small cracks to massive holes, but most repairs are easy and inexpensive to repair. Use a peel-and-stick patch to cowl doorknob holes. Now, screw your drywall patch to the picket cleats, again being cautious to not break the drywall’s paper coating.

In case you’re actually involved about energy, use paper tape for all repairs. Spread drywall compound over the patch, feathering out the edges. Scrape away any loose compound, and use a razor knife or drywall noticed to develop the crack through the wall surface into the stud cavity (picture three). Avoid removing strong, well-adhered compound beyond the crack itself.

Utilizing a putty knife, spread drywall compound over the complete patch, feathering out the sides beyond the patch onto the wall. Then minimize out the section with a drywall saw or utility knife. Twenty-minute setting compound is a good product for filling deep holes and gaps and for your first …

How To Set up Your Personal Drywall

Drywall texture is straightforward and an inexpensive means for wall ornament. The two most common drywall compounds are light-weight and all-objective. Discard the drywall and take away all exposed drywall nails or screws. Use a pair of C-clamps to fasten the backing board to the encircling drywall. Sand your patch space easy. Picture 4: Apply a second coat of compound, drawing it at the least 6 in. past the sting of the primary coat to taper the sides of the repair.

Apply a thin coat of joint compound to the cracked area. This is one time when it’s helpful to have a hole in the wall. When the second coat is totally dry, sand evenly to clean out any bumps. Crease the paper tape down the middle so it suits into the nook simply (Photo 2). It’s troublesome to spread compound smoothly on one side of the corner with out marring the opposite aspect.

Whether you’re utilizing drywall compound, spackling or painters’ putty, all of them tend to shrink as they dry, so you have to to repeat the method several instances before the outlet is properly crammed. Subsequent, fill the opening with drywall compound or painter’s putty utilizing a …

Los Angeles Drywall Spot Restore $299 Flat Fee!

Repairing a large gap in your sheetrock wall is just not as intimidating as one may assume. We’ll present you how and other fixes on your broken walls. Let the joint compound dry for four-eight hours relying on temperature and humidity. To feather the edge, enhance pressure and angle on the drywall knife as you attain the outer edges of the patch space to attenuate, or thin, the joint compound on the drywall. Be certain to observe spraying the texture onto a scrap of drywall or cardboard to nice-tune your technique earlier than you spray it on the wall patch.

Small holes brought on by screws or hooks, wall fasteners or drywall fasteners that pop up are easy to restore, however again time consuming because you nearly always need to repaint the partitions. Reduce away unfastened joint compound and paper shreds. Place drywall piece over the broken area (image 1) and hint around it with a pencil (image 2). Use a drywall or reciprocating saw to chop out the area inside the traced traces (picture three). Cut two pieces of 2×4 slightly bigger than the outlet.

If the crack extends by the seam’s paper tape, or if the tape has …

DIY Versus Professional Drywall Installation And Repair

It can be irritating when you develop harm to your drywall, however there are many ways you may repair drywall seams without an excessive amount of expense or an excessive amount of time having to be invested in it. First it is advisable establish the source of the damage. Box, and the compound hardens rapidly, so you can apply another coat straight away. Allow the compound to dry and sand it easy. After every coat is dry, set a straightedge towards the wall to examine for obvious dips and bumps. Sand the wall after the ultimate coat dries. Cowl the tape and taper or feather” the sides of the new compound onto the encircling wall surface (picture 5). Drywall compound must be applied in multiple thin layers as a result of thicker layers are too troublesome to easy out and can finally cause cracking.

Finish the repair with several coats of drywall compound. As soon as the surface is totally dry, carefully sand the surface by hand using an 80 or a hundred grit sandpaper, one hundred twenty grit sanding display screen, or a medium grit sanding sponge. If you happen to try to patch over this without sealing it …